Monthly Archives: August 2016
Gertie vs Tanya Whelan
Hi, here comes the promised review on these two books Gerties Ultimate Dress Book and Sew Many Dresses, Sew little Time: the ultimate dress making guide. They are around the same price on Amazon.co.uk Gertie is £1 more expensive.

I love Gertie’s Blog and this is a extension of that, it is written in the same breezy style, I will admit if it wasn’t for the fact that it was a Gertie book, I probably wouldn’t have bought it, there seems to be little point in having two ‘Ultimate’ dress books, because Gertie didn’t come out until March and I had already got the other one for Christmas.
Both of them having sewing tips and tricks, to be honest I prefer the photography style of Tanya’s book, the dresses look more shapely and there were a few different models, there were more dresses where I thought ooh I could wear that, in particular the halter neck dress. Gertie’s dresses looked a bit shapeless and unflattering.

Apart from the sizing issue on the pattern sheets, Gertie gives you the 3/4 circle skirt, where as Tanya shows you how to draft your own (I’m lazy I’d rather copy one than draft one) also Gertie’s sizes are ready to wear size and she has a different type of line for each one whereas Tanya has chosen to go from 1-12 in some ways this makes choosing a size more accurate as you are less likely to go for the size you think you should be rather than the size you are. Each set of lines are 1-4 is dark grey 5-8 medium grey and 8-12 light grey I’m lucky in that my size falls on the edge of a colour change.
I feel that Tanya gives you a better understanding on how to alter the basic pattern, the book is split up into different areas the first is bodices and she goes through how to manipulate the darts to get a different shape, and what to do with the necklines. the next is collars and so on, each section give you a photo of a dress then tells you where in the book it tells you about the pattern.

Gertie’s step by step is better and, if not for the drafting issues I would recommend it to beginners, Tanya’s book I think will get more use.

Gertie

Gertie
As far as I can work out from the books, Gertie drafts for a ‘C’ cup and Tanya ‘B’ and I had no trouble at all with the FBA for Liz’s dress. if you look at the two patterns together Tanya’s does have more shaping at the waist, of course it always helps if the waist part of the pattern is drafted correctly, which Gerties appears not to have been as it is 2 inches out on the size 6. (see my previous post)
You get four double sided pattern sheets with Gertie but only three with Tanya. If I had to send one of them back today, I would choose to keep the Tanya Whelan book, partly because the waist patterns appear to be drafted wrong, but mainly because I think I could get more out of this book and I like the pictures better. Luckily I get to keep both 🙂


Gerties Ultimate Dress Book


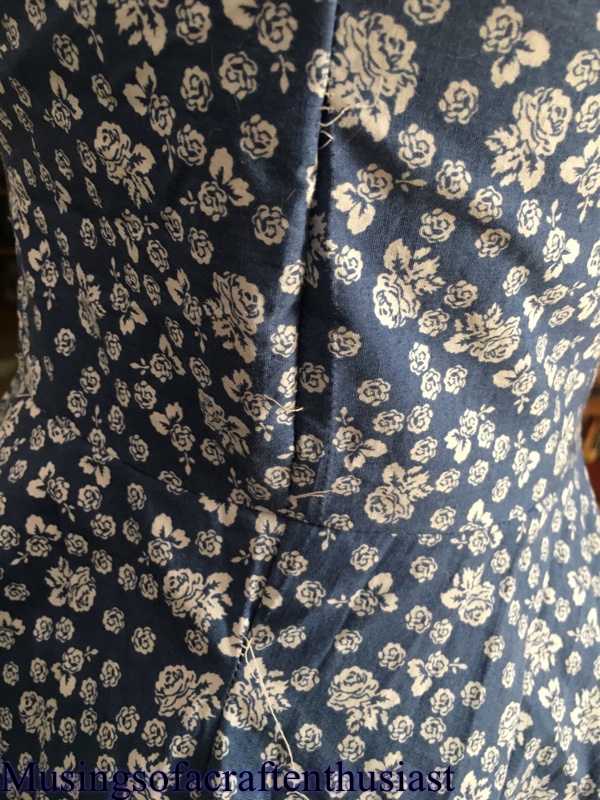
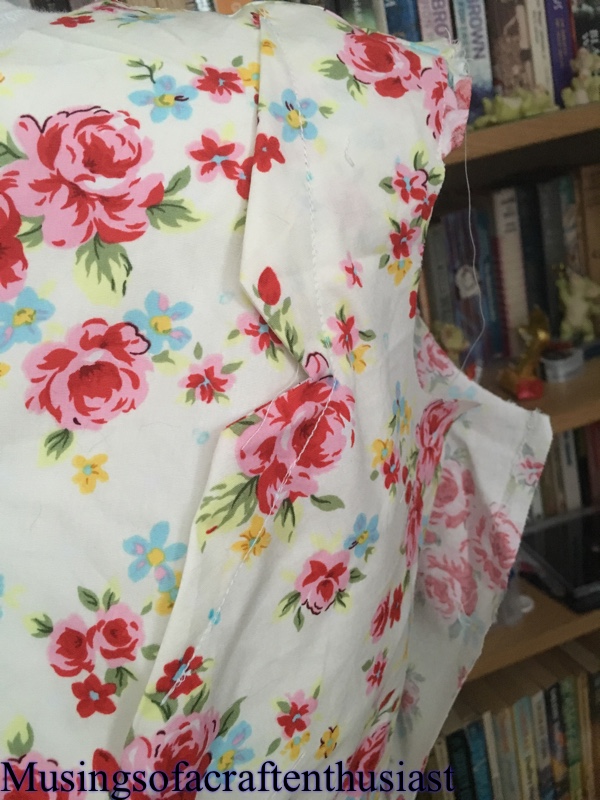
I have a new dress to show you, I made it from Gerties Ultimate Dress Book, If you remember when I made the Dress for Liz I had a problem with the waist, well it turns out it wasn’t all me not cutting the dress on the fold, there is something completely out with the sizing.
The first bodice I made was size four going to size six, I did a small bust adjustment, but instead of taking all the fabric out of the side dart I decided to take half out of the waist dart. These darts are huge to start out so I thought it would be best. It was too small in the chest and in the waist, I measured myself again, the waist size should be fine if anything it should be too big, I have a 27 inch waist and the pattern was supposedly for 28 inch, at this point I thought I had miscalculated when redrawing the waist dart,


my second attempt was a straight size 6 SBA this time I took all the fabric from the side dart. I made a second muslin it was a bit tight, but it got done up I didn’t think any more of it.

I made the changes to the bodice pieces as per one of the posts on Gertie’s blog, cut into my fabric and made up the dress. It went together really easy, I basted the zip in tried it on and couldn’t get the zip done up. 😦 miles too tight I took the sideseams apart and used a 3/8 seam allowance a bit better but I still couldn’t breath or sit down once it was done up, then I did what I should have done in the beginning, I measured the pieces, they added up to 26inches, the waist on my supposed 28 inch waist pattern was 2 inches out and that was without ease what was going on here, so then I got the pattern sheet out and measured that and sure enough that was also out 2 inches.
I didn’t have enough fabric to re-cut the bodice pieces so I had to steal the extra out of the 4 waist darts, I can now get the dress done up and move about in it, I do need to revisit the alteration to the side seams as one side appears to be a bit wonky but other than that the dress went together very nicely.
I had read on the internet that the midriff piece was wrong, but it looks like it could be affecting all the waist sizing. I had already been slightly concerned because the skirt didn’t seem particularly long, I’m 5ft 2″ (and a bit) it come to just below my knees and the bodice didn’t need shortening, though I did take about 1/2 inch out of it in the end.
I am concerned though that the publisher hadn’t checked the pattern sheets before printing, especially seeing there is a printing error in Gerties first book and I’m still not convinced on the sleeve pattern for the shirtwaist dress. I have the second book as well but I haven’t made anything from it yet.
I am going to make the same dress but use the bodice pieces from sew many dresses so as I can do a direct comparison and give you my thoughts on both books.
Birkin Flares – no 5
There isn’t a lot I can say about these Jeans that haven’t already been said, I still love them and they are really comfortable.
No 5 is a little bit different, in that I bought 3 metres of white stretch denim, what is that I hear? you say not white? well it isn’t white any longer I cut in half and dyed one bit purple and the other bit green.
I used the Dylon machine wash dye, no need to add salt, it is all in the packet, you wash the fabric first, check then add the dye then the fabric wash it, wash it again, then run the washing machine with nothing it.
The fabric came out mainly alright, both the green and the purple had some weird spots at one end, luckily because the fabric was so wide, I have been able to cut around them, but I wouldn’t have been very happy other wise.
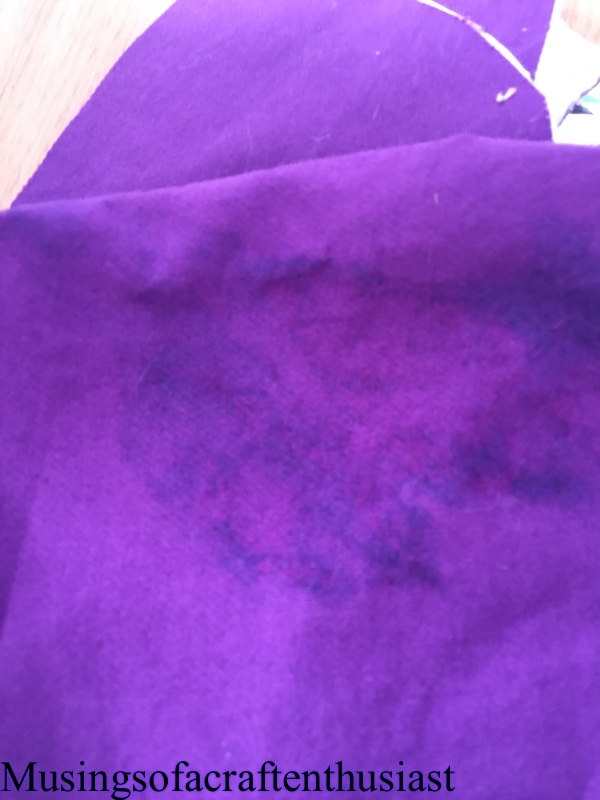

It is quite weird, the Purple has come out on the photos quite accurately but the green not so much, the green is a vibrant forest/emerald green rather that this wishy washy grey green.
As in most of my starts this year I haven’t got very far….
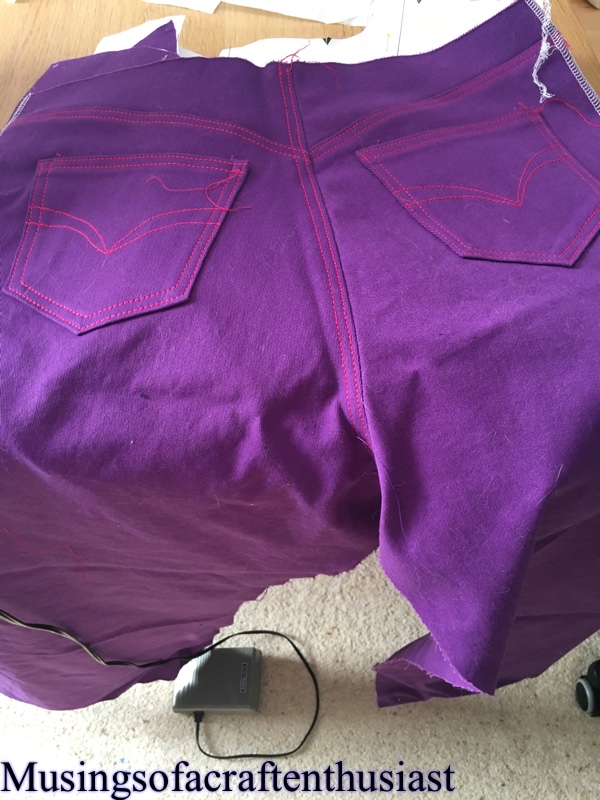
I decided I wanted pink top stitching, but couldn’t find the exact colour in topstitching thread, but i have seen a few people say that they just doubled up on the normal thread, I think it has come out very nicely.
more soon
This post is brought to you by sewing disasters such as……
A) not pre washing your fabric
B) making a shoddy job of up-sizing a top pattern
I will confess I have some what lost my sewjo this year, after finishing The Dress For Liz, which I had a deadline for I’ve sort of been at a loss, so I have decided to fix a couple of sewing disasters. You might remember this border print dress after I finished it I washed it, apparently I hadn’t washed it before cutting it out doh…to be honest back then I didn’t always pre wash, I’d never had a problem until this dress.
After taking it apart and giving it a good iron I compared the pattern pieces and discovered that each skirt piece (8 in all) have lost 5/8 th of an inch that was a lot of shrinkage, no wonder it no longer fitted

 So I have re-cut the skirt luckily I had already decided that I didn’t like the way a the hem looked and I was planning on shortening the skirt anyway, which was just as well as to get the width from the skirt pieces I needed to cut off about 2 inches from the top of them.

Luckily I had enough fabric left over from the original fabric to totally re-cut the bodice, which I have done, I also make the adjustment that I would usually make by taking 3/4 inch out of the bodice.
So far I have but all the darts back in, 2 in each skirt piece and three in the front bodice, unfortunately it is a bit hot at the moment for ironing, but this is England so I’ll just give it a couple of days 🙂
The other dress this one I made a bit of a hash of it, it was too big but because of the cut-out I couldn’t just re-cut the bodice from the original, I had to buy another half metre of fabric.
Out of the new fabric I have cut the front bodice and half of the facings, I’ve used the original back peice and cut that smaller and have cut the front neck facing from fabric left over from the original fabric.
So far I have overlocked the original skirt pieces, done the darts in the bodice and again waiting for the weather to break.
UPDATE
Didn’t manage to get this posted before the weather broke, as I said this is England.
I now have all the pintucks done in the border print dress, and the 8 skirt panels have all been overlocked.
On the other dress I have the bodice put together, it is now waiting for the facings to be put on.
bye for now
Pierre Lemond – Photoshoot
Hi, one thing I didn’t mention in my Olympia post is that Mum and I bought one of those Glamour Photoshoot packages, I will say that although what we were sold wasn’t quite what we got it was a good day out.
The lady at Olympia was very enthusiastic, the less interest in participating I showed the more enthusiastic the lady got and the lower the price. She sold it as pampering day out, you would get your hair, nails and makeup done, check, check and check, there will be a stylist who would help you with your dress choices and tell you what suits you, no, no stylist and no one to talk through your choices with.
Our appointment was at 2 o’clock Saturday afternoon. I was told when they phoned me to confirm the booking, to arrive 15 minutes early and if we arrived late there was a good chance that we would not be able to have our photoshoot. Looking at the way the day had been structured you could see why. The appointments were set an hour apart so as you were finishing one bit the next couple were getting ready start that bit.
We arrived in London about 12 o’clock, we had decided to have lunch before hand, and I had checked that we could leave our suitcases at the studio, (we took four outfits each, in expectation of the stylist Mum had taken a couple extra tops just in case, and I had an extra dress) we had lunch in a small cafe on the corner a couple of minutes from the studio. the food was good and not too expensive for London, they also had a very interesting Light installation.

When we arrived at the studio for our appointment, there were one couple waiting to get their hair and makeup finished, one couple waiting for their photos and one having photos taken.
We filled out a questionnaire on colours and hair styles and what type of photos we wanted, I think we probably over thought it, and as the girl asking the question informed us they probably wouldn’t look at them anyway.
I had my nails painted first, don’t expect it to last too long by the time I got home it was already chipped, the hair and makeup lady asked me about my clothes and as I have two 50s dresses she said she would do 50s style makeup and hair. by the time she got to my hair she appeared to have either forgotten that or gone off the idea as she just tided up my existing hairstyle.

before

after
The best bit of the whole day was the actual photoshoot, the photographer was brilliant, he put us at our ease he knew exactly what he wanted us to do, and I had a ball I probably got carried away into fake model mode, I made eyes at the camera, I stared off in to the distance it was great.
Most of the clothes I took I made myself, in fact the only item of clothing I didn’t make was the t-shirt I wore for the last segment.
After we finished the photography we had to wait around while they downloaded the photos then they called us into a small room to view the photos an choose which ones we wanted, apparently the photographer usually only does 80 but we had 100, we were left alone with them scrolling across the screen, if I’d have thought about it I should have videoed them with my phone.
Mum and I had both come out of the photoshoot, saying we had a bad feeling about the photos being too good to miss out on taking more than the four we had allotted ourselves which were the two free ones and two more I could use the deposit for. We were right, seeing as neither of us like having our photos taken they were very good.
We came away with more photos than we planned but less than we really wanted to.


