Monthly Archives: February 2016
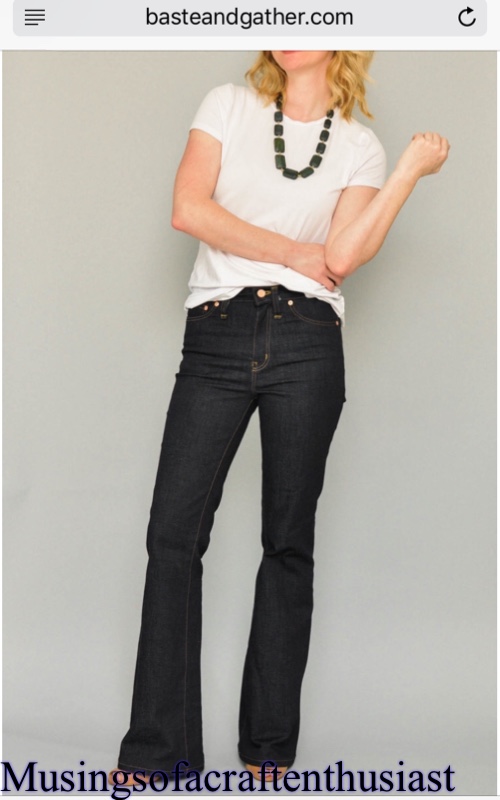
Birkin Jeans – Baste and Gather
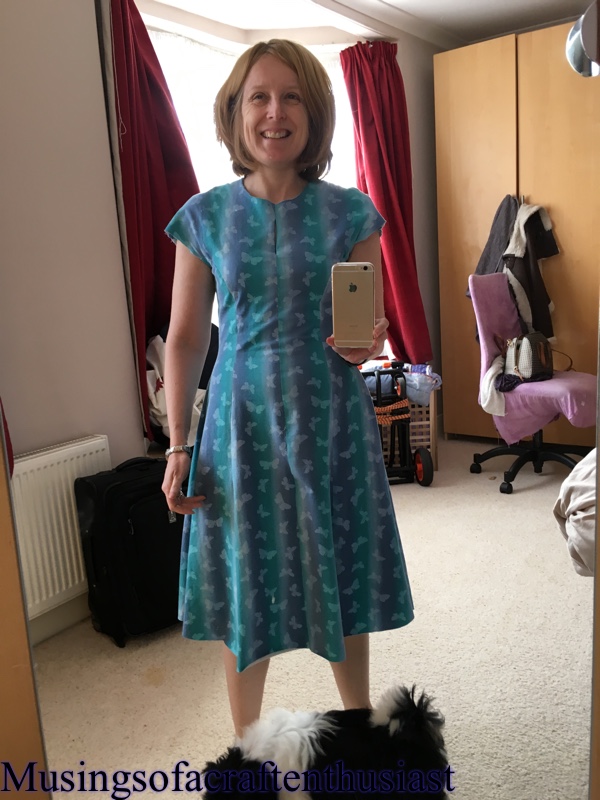
Hi, I’m having a busy year so far, I’ve made a lot of things but not finished them, if you read this blog I think that you will find this is a recurring theme, However I do have something to show you that is finished.
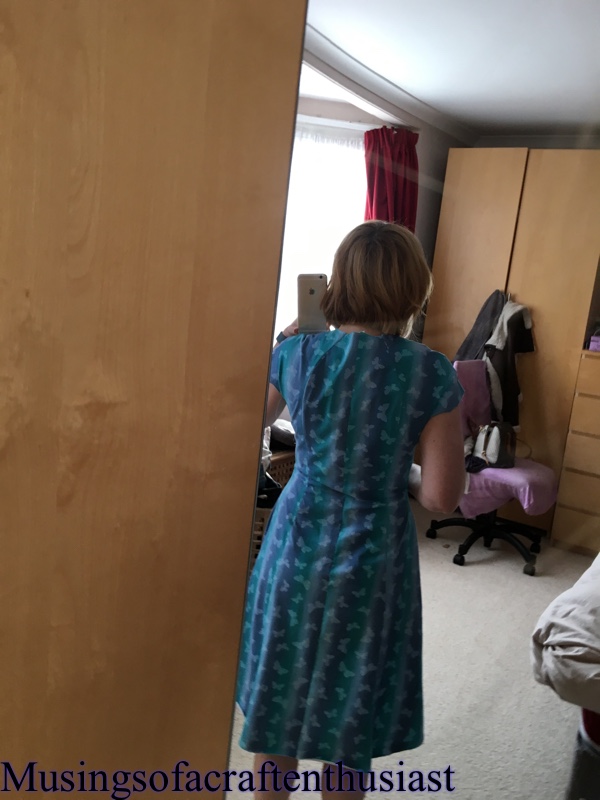
My first pair of Jeans, and they look lovely, I cheated top-stitching wise, my fabric is Black and so is my top-stitching but never fear I’ve started on a new pair which are dark blue with red top stitching, a photo at the end of this post.
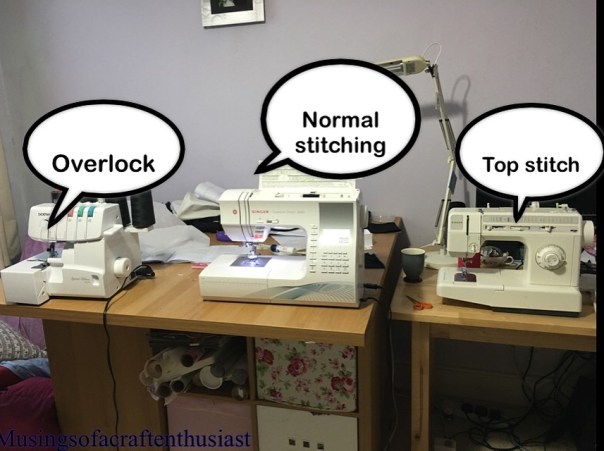
I do have two sewing machines which make assembling this pattern a lot easier, my usual machine is set up with the normal thread and my older machine with the Top-stitching thread.
I bought the fabric from eBay, it was the cheapest 10 oz denim I could find, when it arrived, I wasn’t too sure about it, it was quite stiff, but after washing it, the fabric softened up a lot.
This is the first PDF pattern that I have downloaded that you can pick which sizes to download, this is genius everyone should do it. It makes it easier to to grade between sizes and you don’t get all the confusing bits where all sizes congregate in one spot. I printed 26 and 27, in the end I just made a straight 26, I took 3 1/2 inches out of the length, looking at the sizes I should have taken out 4 inches but I’d rather they were too long after the next wash than too short. With shop bought jeans I sometimes find they keep shrinking into the second and third washes.
The instructions were brilliant and I would say that as long as you know your way round a sewing machine, you should have no trouble making a pair of jeans whatever your skill level.
The back goes together first, I put a couple of lines of stitching on the back pocket, just to give it that ‘authentic’ jeans feel

The fabric is a lot blacker than it looks here, but at least the highlights are showing off the stitching.
after this you start working on the fly, I would say that the instructions for this is better than the instructions for the Sewaholic Thurlows, but it does use a lot more photos.


one thing this fabric does do is attract the cat hair :-(, here are some photos of the front made up.
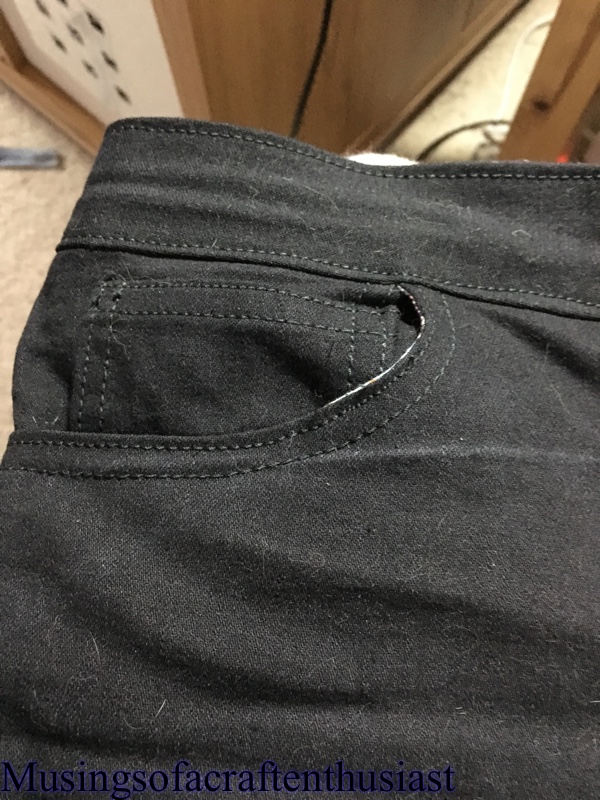


I am very pleased at how they have turned out, the only bit I am slightly disappointed in myself is that there is a tiny bit of pocket lining showing on the curve of the pockets, but that’s what a black sharpie is for.
As promised a shot of the pair I am working on now.

I decided against patterning the pocket as I thought it might be too much red, but now I sort of wished I had.
I used a different foot for the top-stitching the first one was done with a 1/4 inch quilting foot the second pair of jeans I decided to use the stitch guide foot, which I’m finding a lot more accurate.
bye for now…
2016 is shaping up to be the year of the indie pattern
Usually I stick with the big four, well actually two, Butterick and Vogue I have occasionally gone to Newlook, to be honest I’m a bit confused as to why they are called the big four as they all appear to be now owned by McCalls but who am I to question why.
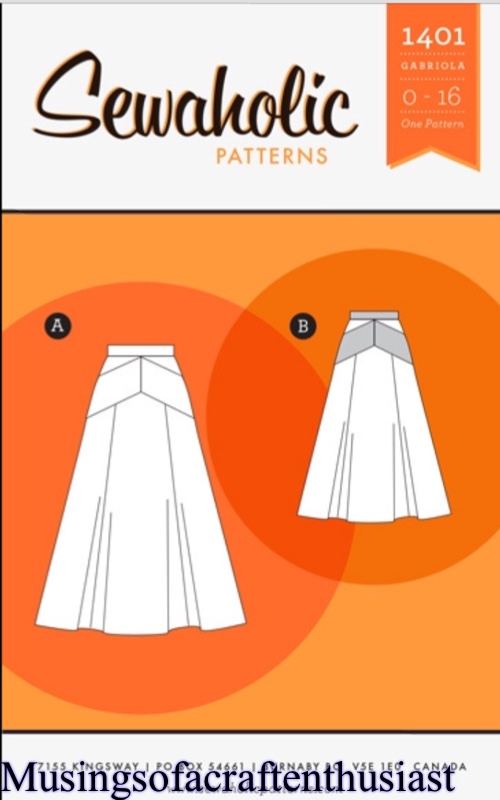
This year I’m going Indie, I already have By Hand Londons Anna Dress, Pinup Girls Bra pattern and what seems to be half of Sewaholics pattern line – Davie Dress, Gabriola skirt, Cambie dress, Thurlow Trousers, Hollyburn Skirt, Belcarra Blouse and Granville Shirt. I have added the Birkin Jeans from Baste and Gather and two patterns from Hey June Handmade, Cheyenne tunic and Lane Raglan.
I have always fancied making Jeans but the pattern that seems to be most talked about is the Ginger Jeans, to be honest I haven’t worn Skinny Jeans since the last time they were in, and mostly I remember not being very comfortable especially while sitting down, I know they have bought out a bootcut addon pack but I still find them a bit meh. The Birkin Flares however I love, love all the photos I’ve seen of them and all the reviews seem very favourable.
Of course while I was checking up on the Jeans I came across the Cheyenne Tunic, which is quite close in style to the FatFace Popovers I’ve been buying (in the sale) so I thought why not. I have some very nice stash fabric I can use for it hopefully before I go to Olympia 4th March. I need to stash bust pretty darned quick 🙂


Sewaholic Davie dress
Hi, since my brief look at knit fabrics I have been looking to complete Sewaholics Davie Dress, when I ordered it I hadn’t realised that it was made in a stretch fabric, but I was willing to give it a go. I had some fabric bought from eBay that I wasn’t all that keen on once I had it delivered so it was ideal for my test run.
My first problem is that I’m not a pear shape which is the shape that Sewaholic favours, at 33 27 37 I was alright for waist and bust with a US 6 but my hips are a US 2, what I have done before in this position is just cut a straight US 6 but I have ended up with too much fabric at the hip and it has looked just plain wrong, so I decide to grade down from the waist to the hip size, I used my new hip curve and was very happy with the results.
I did a quick pin to my dress form and it looked alright
My second problem is that I’m short 5ft 2in and I do usually have a problem with princess seam but I’ll cover that a bit later.
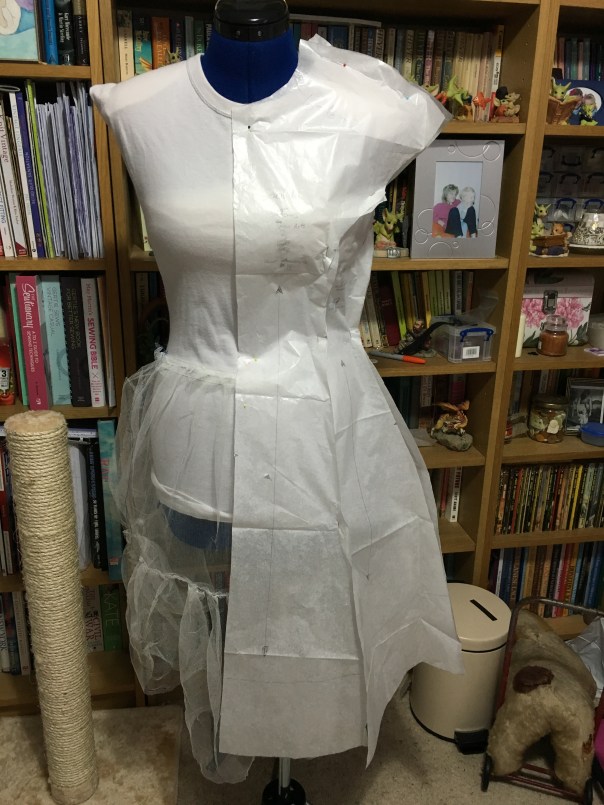
Who wants to see the first attempt at the dress.


I would like to say it looks a lot better on the dress form than it did on me and also by this point I had already raised the shoulder seams about an inch. The dress was just too big all over, except on the hip, the other problem was that without raising the shoulder seam by an inch the bust part of the princess seam was way too low, and even with the inch taken out it still wasn’t sitting properly.
Because of the amount of excess I had at the waist and bust I decided to try a straight size 2, after all there are 8 seams so I could quite happily ‘steal’ back 2 inches from the seam allowance. Also by going for a size 2 you already lost 3/4 inch from the shoulder.

What I didn’t realise was how rollyupy the already cut pieces were going to be and ironing them didn’t help 😦 however what I did find was that if I laid it on the ironing board it stuck to the cover like fuzzy felt, I managed to keep it flat enough to cut the new pieces out.
The dress went together very nicely, I used a normal straight stitch as this was only a test dress, zigzag is so hard to unpick, also I don’t like the way it looks on the outside. I might just use my overlocker in future.
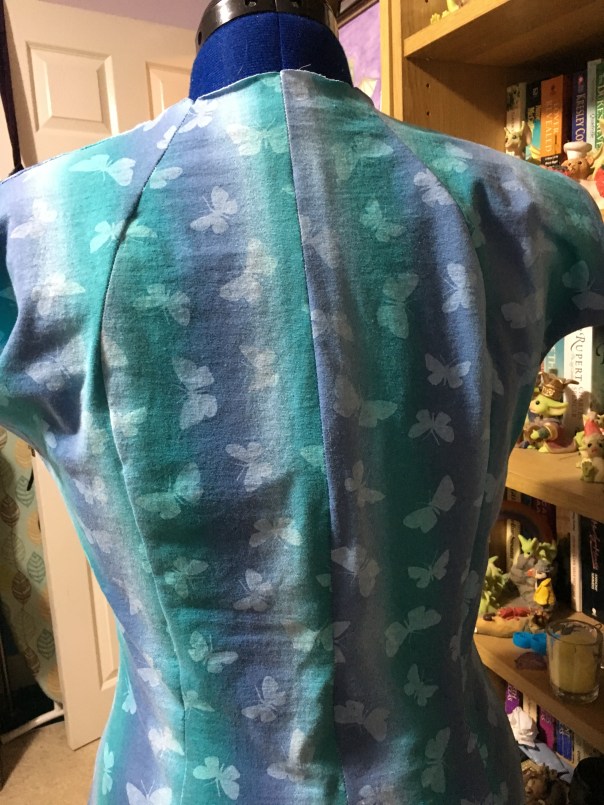
Here is the dress with the basic seams put in it fits loads better.
There is something squiffy going on with the back, but I’m not sure if it is how I standing, the shoulder seam could do with coming up slightly which will might fix this and will bring the bust point of the dress up to the correct position.
I made the longer length which comes just below my knees, I’m not sure if the shorter one might be just out of my comfort zone.
I’ll be back with the finished article soon, also I like the fabric made up a lot more than just laying in the drawer so this might by my first dress for Florida.
It is a medium weight stretch fabric with a nice amount of body, I used my walking foot which is brilliant and my sewing machine didn’t try to eat it once, bonus!
Also on my cutting table is By Hand London Anna dress, more about that soon.
Butterick 6254
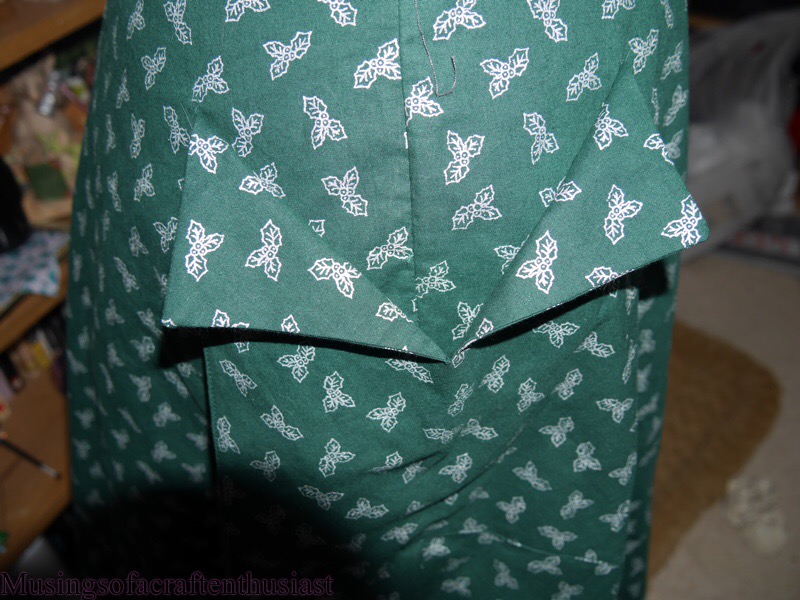
This is a great pattern and is the first Butterick pattern that the finished garment actually looks like the picture on the front of the packet.

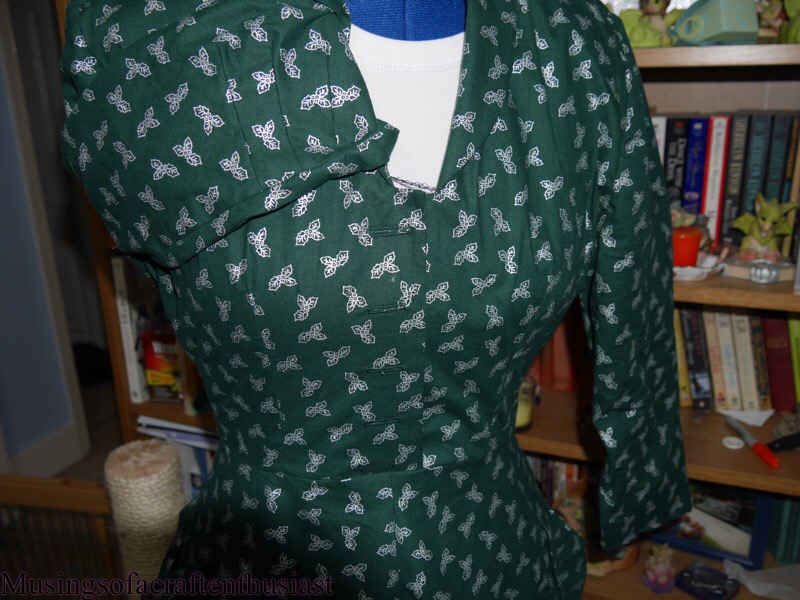
The only problem I have with this dress is, it is either too late for Christmas 2015 which is what I originally planned it for hence the dark green with little silver holly leaves, or miles too early for Christmas 2016.

I actually removed an inch from the length of the bodice because of the proportioned dress and then I did a SBA on it removing half an inch across the pattern piece.

The details that I love on this pattern are the patch pockets which to begin with I wasn’t really sure about and the beautiful shawl collar which went together with no problem at all.
 The collar is one of those ‘part of the bodice front’ collars where you put in a couple of darts in front then it wraps round to the back, and tada you have a collar, once you have fiddled about trying to get it to play nice with the back piece and wonder why you have ended up with a fold in the wrong place. I had no problem with the back and it just went in, I’ll be intrested to see if it goes together as well the next time.