UFOs
well, I don’t know what happened to September, but it is now a month since my last post, oops…..
Hi I don’t know how everybody sorts out their off cuts, but I have a bad tendency to ball up what ever scraps of fabric I have left, whether it is big enough to to make something else with or not. This last weekend I decided to go through the off cuts and just throw them away, yes there is the ‘dream’ of creating a beautiful quilt with them, but who am I kidding, I’ve made two double bed sized quilts, both of which took me a year to make and a four foot by four foot that is still waiting for me to finish quilting it four or five years after I put it together.
I had about two bin bags full of fabric I’d been keeping, even the stuff I didn’t like and the woolen skirt material that you couldn’t even use for a quilt even if you wanted to make a quilt which at the moment I don’t.
Anyway to get back to the actual point of this post, have you ever come across projects you have started and then completely forgotten about them and can’t remember why you didn’t finish them in the first place
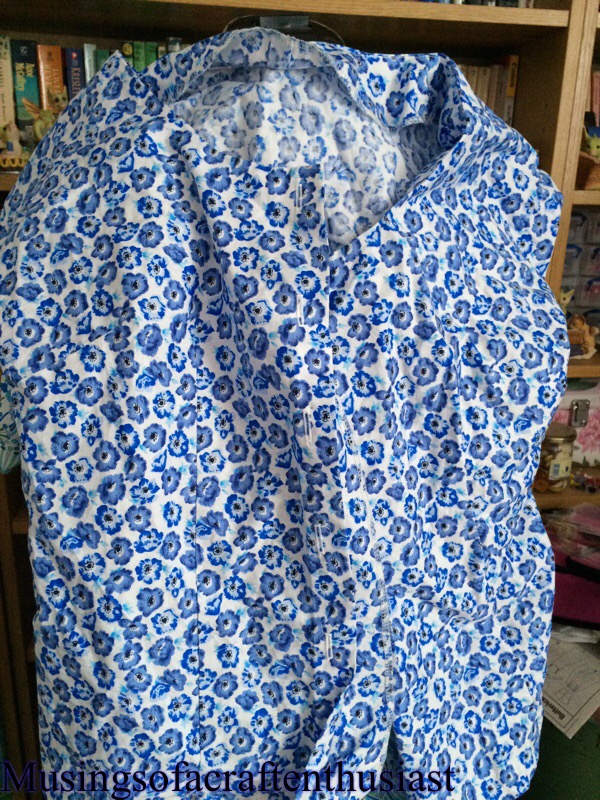
I have a rather nice little blouse, I’d forgotten all it needed was the facings stitched down and the buttons put on it, of course when I started stitch the facing on one of the sleeves I found out the reason it wasn’t finished is that I had cut through the facing and really need ed to take it off and replace it. (Let’s hope I haven’t just thrown all the leftover fabric away)

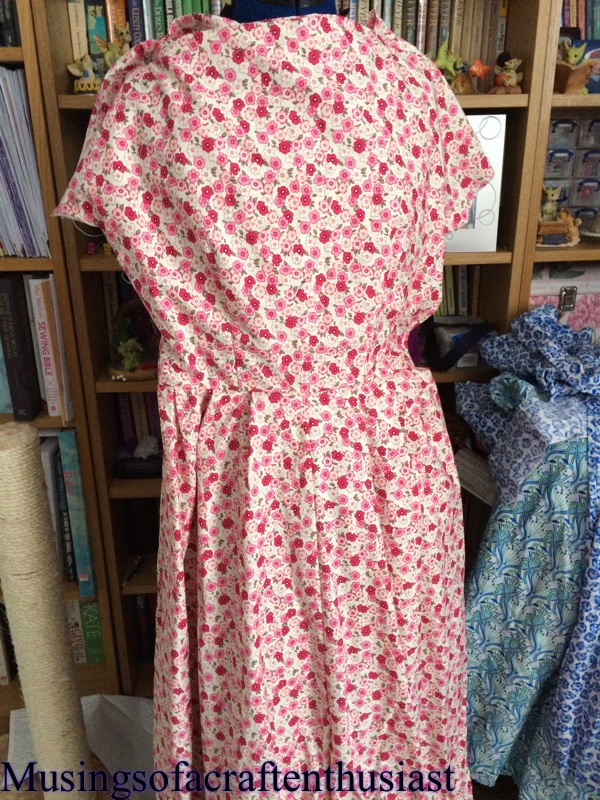
I have also found a dress that also just needs all its hand stitching done, facings, hem and buttons, I think at the time I made it I wasn’t happy about how the shoulder was sitting but now it doesn’t look as bad as I thought.

I think there is a pattern forming because there are another two dresses that need hemming and their facing stitched in, I really need to go straight for the hand stitching as soon as possible.

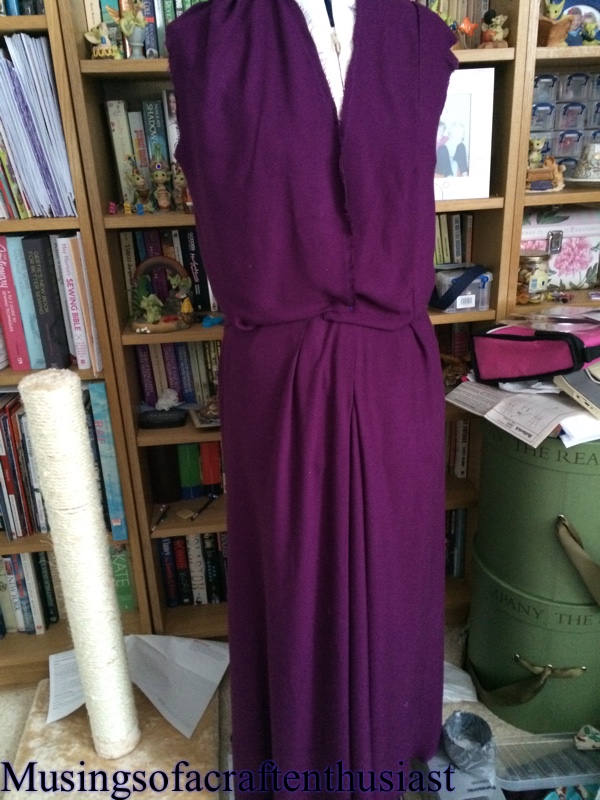
There is another dress but that isn’t just hand stitching and looking at it, it will need taking apart and redoing, it is one of the first Haslam patterns I tried, the fabric is too drapey for it and I think the underarm measurement is too long, as when I attached it to my dummy there must have been two inches extra fabric and I am sure this is wrong.
I’m not sure how to finish this post so I’ll leave you with au revoir……
The Walkaway Dress.
THe Walkaway dress, well we started it we put the three peices together then we put the bias binding on.
I can honestly say this was the most boring thing I have ever made, the other thing I would like to say is if Butterick sold so many of these patterns in the 50s where are they? I can’t help feeling that 1950s sewer had as much trouble with them as 2015 sewers and a lot of them went straight in the bin.
I did learn a couple of things, I made my own bias binding for the first time, the print I used in the end was too busy for a shop bought binding, the binding looks great. I bought a bias foot for attaching it I found that it didn’t make it easier or harder to attach the binding, Denise found it a lot easier not to use the bias foot at all.

I read up a lot on the internet before starting this dress, I was particularly worried about Denise’s chest so we cut her upper chest size to start off with and graded out for the bust, it is still a little bit gapey around the sides but fits her shoulders, it is unfortunate that she has lost a few inches from around her waist since we cut it out so it is a bit big in that area we decided to just fold over the excess fabric.

The other thing I am assuming is that the 1950s pattern did not tell you to hang the dress for 24 hours before hemming, that would have completely put paid to the ‘start at breakfast, out for lunch’ slogan.
Simplicity 7995
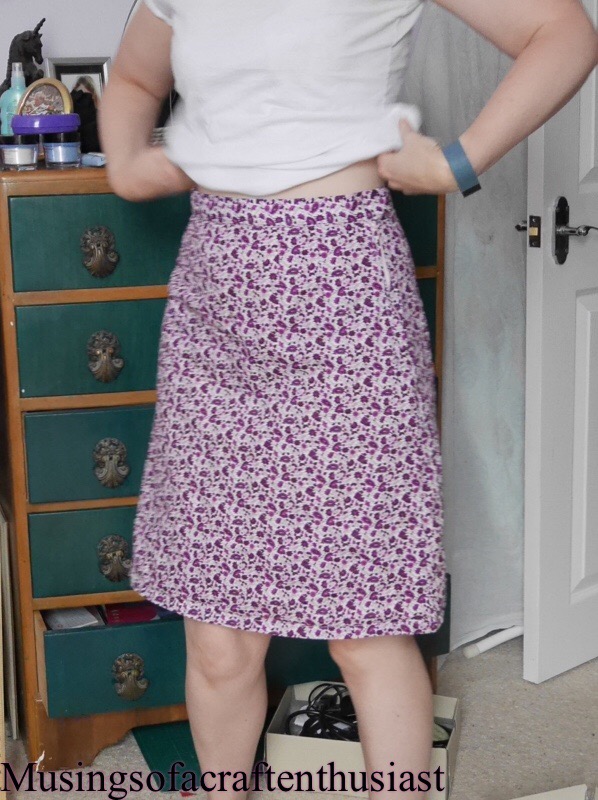
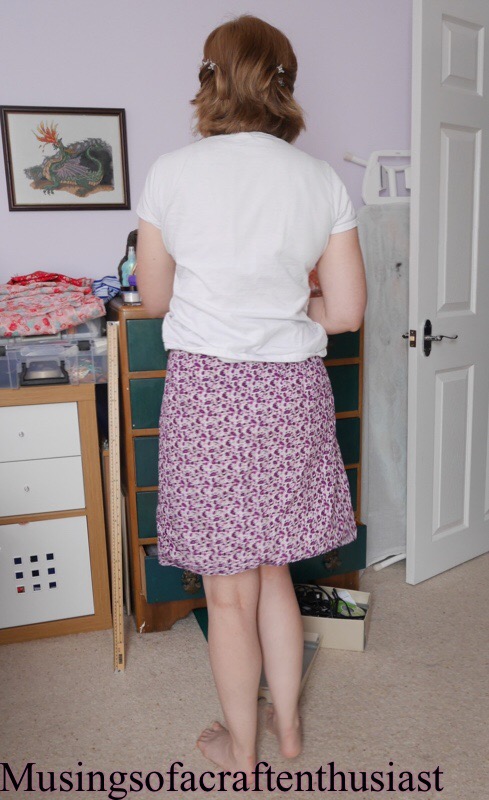
I mentioned a couple of posts ago that I had made this skirt, well I have actually made two (almost).
A couple of weeks ago when the Summer was still sunny, I realised I didn’t have the skirt equivalent of Jeans to wear to dress down Friday, so Thursday evening I looked through my patterns and picked this one
I wanted originally to do view 1 but when I opened the pattern envelope I didn’t have the pattern pieces. 😦
I really, really have to get in the habit of checking things like that when I get new patterns, to be fair I can’t remember where I got the pattern from, it could have said pieces missing on the auction.
So I decided on view 3, which was probably just as well as it is only three pieces and no top stitching, I had this piece of blue cotton I had bought from Kayes on a whim, I had been planning a play suit type thing for the holiday, I discovered that although the bust size was right on the pattern the hips were wrong so the playsuit didn’t materialise, which is probably just as well I’m having serious doubts on the convenience of going to the toilet while wearing one.

Back to the skirt it has four darts front and back, I was sneaky because i knew there wouldn’t be time to wash it first I used tailor tacks, which in general I hate I always get at least one or two that won’t stay in place.
 The zip went in first time and looks good, I think/hope that I’m getting the hang of those now. I used waistband facing for the waistband (obviously) which always comes in handy with the cutouts for folding, to save time I also machined the inside down, which i don’t always do because you get a much better finish hand stitching it. I machined a small hem on it and wore it down stairs to show Simon, we both agreed that it needed a lot off the bottom. infact I took practically 4 inches off it , Looking at the picture I’m not sure just how tall these models are but they ain’t 5ft 2 in.
all in all I think it took me a couple of hours to cut out and put together, so I’ve made another one.

1980’s Shirt
Hello

If I remember rightly this is the only thing I have made Simon and he has worn, there was an ill-fated crochet jumper, that not only would it have boiled him alive had he been able to get it on, it bore a large resemblance to chain mail. Very thick, very heavy chain mail in wool form.

Simon plays guitar in a eighties cover band they did a Hawaiian themed party night, for which they were going to wear Hawaiian shirts and shorts/jeans of their choice, I offered to make Simon a shirt, I bought an authentic Eighties shirt pattern and suitable fabric (Alexander Henry, Mahalo Girls)
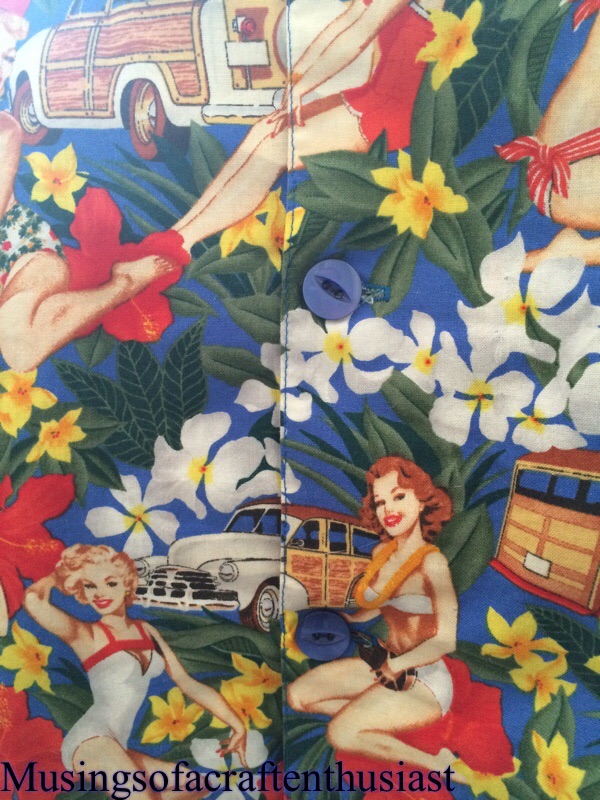
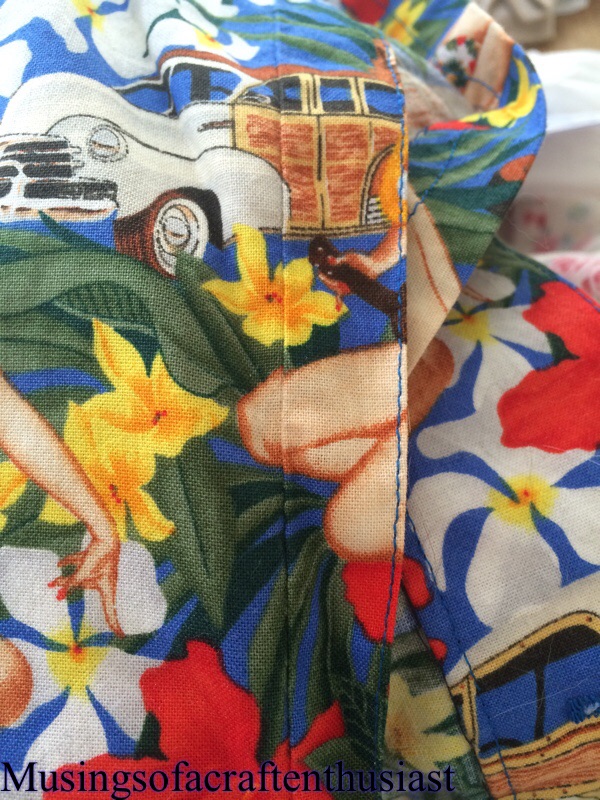
The pattern repeat was quite wide but I wanted to make sure that the pattern matching across the front was spot on, which is where I made my first mistake, the facings were part of the front pattern piece and because the repeat was so wide I needed to cut the facing separately, some how I calculated the seam allowance the wrong side of where I wanted it which is why one side finished off looking like this.
It was very easy to put together once I had sorted out my pattern matching, it was the first thing I had put together where you put the sleeves in flat then stitch up the side seams and underarm seam.
Simon is very pleased with is and says it is very comfortable, I did say if I made it again I would put the first button further up, but watching an episode of The Goldburgs last night I see the button is exactly in the right place

Drape Drape 2 a small review
A small disclaimer I didn’t buy this book it is Denise’s.

Any one that has watched The Great British Sewing Bee (GBSB) will know which pattern enticed Denise to get this book and it would be interesting to know how many of the sales of this book was for the same reason.

The pictures are very clear, but I was left with a feeling of just how many of these clothes could actually make it in the ‘real’ world, not many.
there was of course the asymmetrical top featured on the GBSB and on the page before that there is this top which look really nice,

but you also had this and this WTF???


Now if you are thinking of buying this book with a view to making any of the projects please be aware that the sizes although they say S,M L,XL this is extremely misleading.
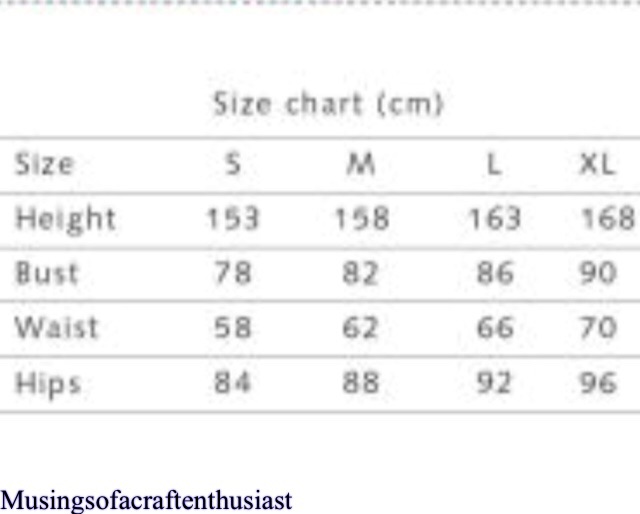
For instance the XL is for a 5ft 6 inch (ok so far) woman with a 35 1/2 inch bust 28 inch waist and 38ish hips, the sizing is approximate as they are all in cm. As one reviewer put it on amazon ‘Pixie Sized patterns’.
So if you fall within the narrow sizing options or are comfortable sizing up you then get to enter the minefield of tracing off the pattern. ‘The Pattern’ is on sheet 2, (I think) you then spend a couple of minutes trying to work out what you want to trace off, which I did. After tracing it off I’m thinking that it was a bit small which is when I realised that my drawing needed to be lined up a further two more times on the same sheet, you had the front half, the back half and the hem. The whole experience was very reminiscent of the Burda magazine patterns I attempted to trace off in the late eighties early nineties, which as far as I can remember was never a success.
So If you want to just admire the pictures and wonder how they got the models in to these outfits then go ahead and buy it, or if you want to make the patterns and you are a ‘pixie’ sized person this is the book for you.
hopefully I will have an photo of the asymmetrical top soon to show you.
Dress update
Hi, you might remember the Butterick 7556 and Butterick 7240
I managed to get out in garden this weekend and take a few photos, I gave you the dressmakers dummy photos but here are some full length photos.
Butterick 7556


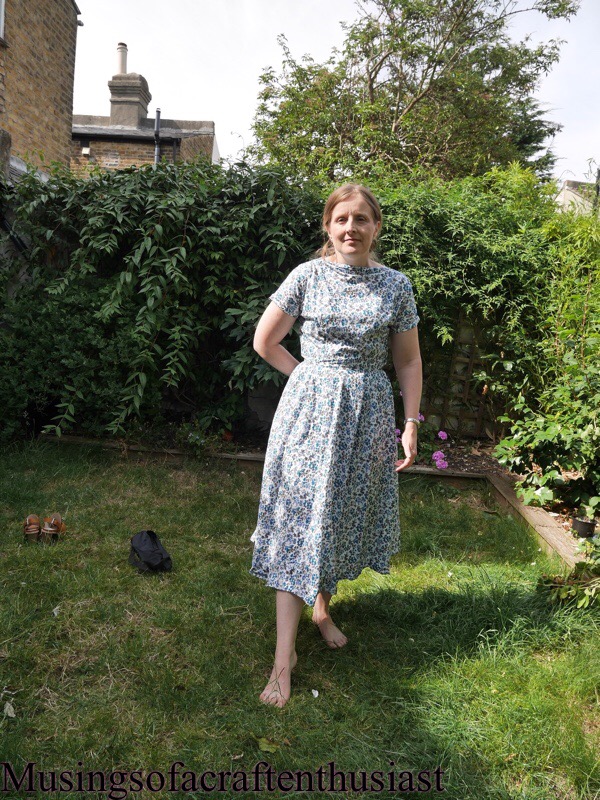
The first two pictures look alright, the last two, I’m not sure if I’m standing but it looks like I have no waist.
Butterick 7240

 here is a good look at the hip detail
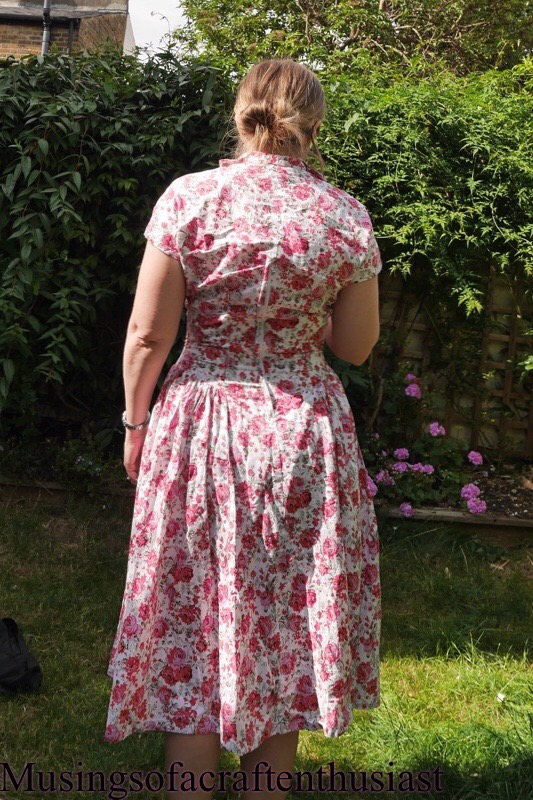 The dress could have done with an iron but I didn’t want to miss the moment, the tripod does make a great deal of difference to the photos but I do have to try and get rid of the total look of concentration on my face while trying to use my iphone to remotely operate the camera.
Marathon Skirt making project
Don’t worry I havent forgotton my Haslam blouse, it is on the back burner at the moment, have you ever had a project that goes together fine in the testing stage but once you get to the actual putting it together what could go wrong will go wrong.
That is my Haslam blouse, first I made a hash of the corner trying to French seam it as per the instructions (got a small hole in the corner 😦 ) the second one I tried went together beautifully, then I noticed a small mark on the front of the section on the one of the fronts, normally I would have just swapped it out, but I’d just overlocked the whole lot, after deciding to give the french seams a miss.
This weekend I have made, or at least started 5 skirts, 3 are all the same pattern and for a friend, she has just had abdominal surgery, and her low waised ‘modern’ skirts and trousers rub in the wrong place, since going back to work she has practically lived in 2 skirts I made her for chistmas.

 The pattern was created from the Lutterloh 70s book, I have already made another long skirt, but as she is about to go on a boating holiday they are not practical, so using the same pattern, but cutting it shorter here are three more skirts.

I have also made two skirts for me, one is an unblogged 70s skirt pattern from simplicity. The other is a Haslam skirt,

I made a mistake on my fabric choice for the Haslam skirt, the check doesn’t lead it self to darts and I’m not sure that it can hold the pleats.

The skirts are all put together and just need their waistbands and hemming, the Haslam skirt also needs its pleats.
Hopefully I can get some photos before my friend goes on holiday.
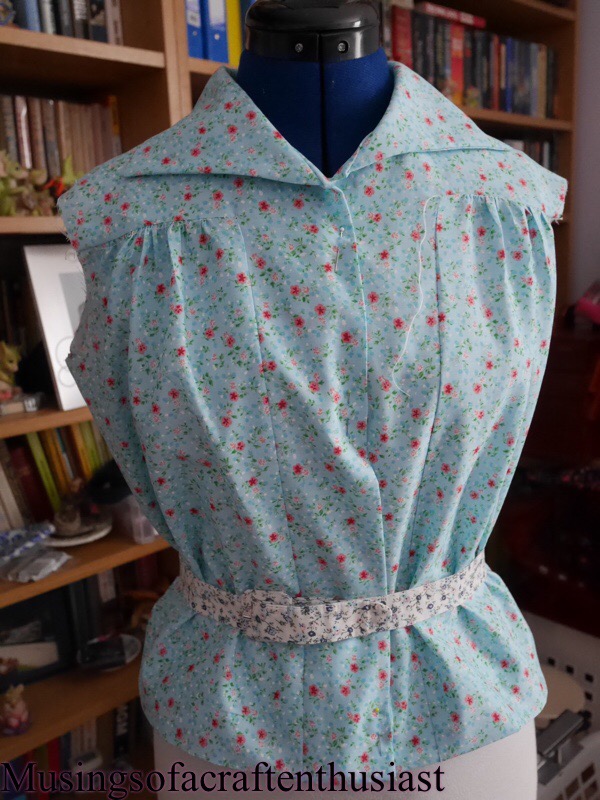
Haslam Blouse pt3
I came across an interesting piece of information while reading my haslam book of dressmaking, no wonder the sleeve looked a bit weird and pully across the front, apparently you don’t line up the under arm seam with the under sleeve seam.

I must admit after I removed the sleeve and reinserted it as per the instructions (which was also in the front of the drafting leaflet) it actually sat a lot better.

The facings and the collar have been inserted, the blouse is looking very good, I’m still not certain that I would wear in this coloured fabric but the blouse is wearable and the correct size.
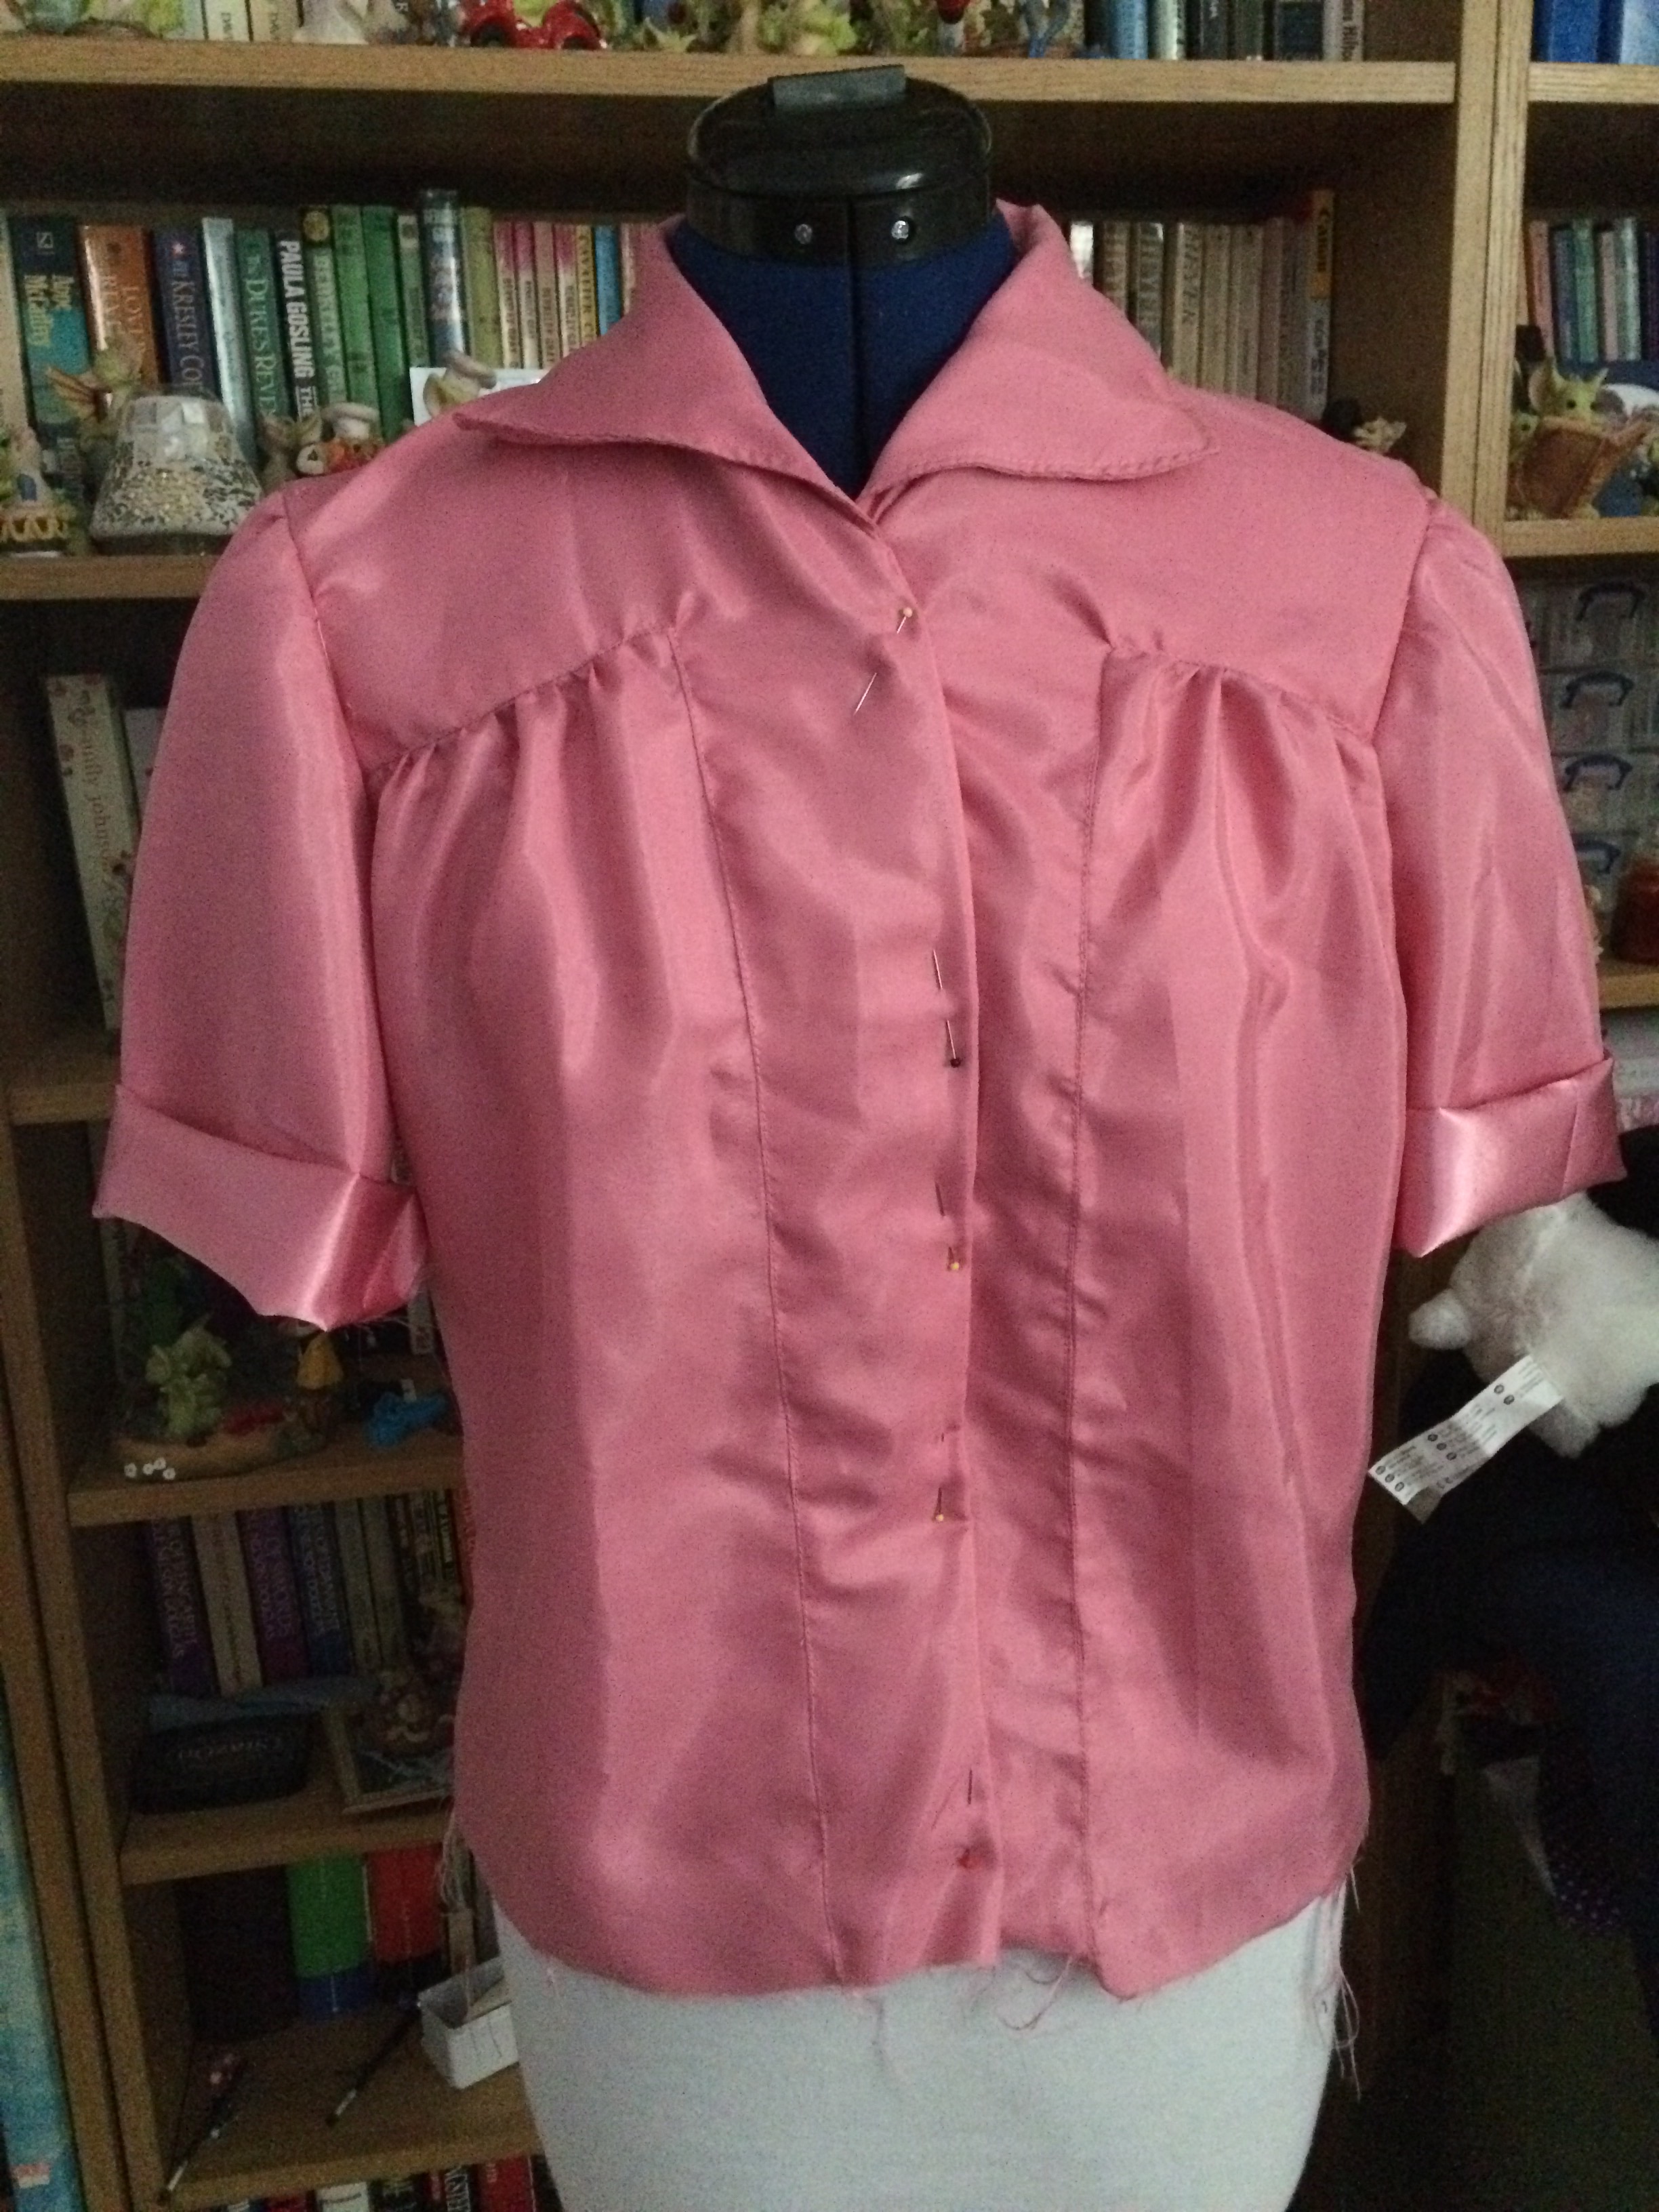


Of course at this point I’m wishing I hadn’t done a shoulderectomy on my dressmaking dummy as the blouse was a bit droopy, but I soon fixed that with a couple of bits of card stuffed under the t-shirt.
The Collar looks a little bit wonky but I’m not sure if it is just the way that I have attached it or if the picture is off slightly.
The next step is to find a nice lightweight fabric and make one that will be nice to wear to work.
Dressmakers Dummys
I have quite a nice dress makers dummy it is one of the ones with the dials on it to make it bigger and smaller, and I bought the one you could do trouser fitting on it.

I got it last year, I’d always wanted one so I bought one, I quite quickly found the major downside to it, the shoulders, with the mainly 1950s dress I was making it was fine right up until I put in that pesky second side seam in, if the dress was big enough to go over the shoulders of the dummy it was too big in the chest for me, and even if it didn’t go over the shoulders it was more than likely to be too big in the chest.
It was then I found out about dummys with collapsible shoulders (drool) I searched the net, I found out about wolf (very expensive) and PGM (not quite so expensive) but still in America so even if they would export to the UK you were looking at adding another £200 for shipping and import duty.
Then I found out about Kennett and Linsell goody, I thought, they are in the UK not sure why my google searches didn’t find them, but it must be cheaper to buy from here than the States (wrong!!!!)as far as I can work out as they don’t have any prices listed it costs about £700 for one of these dummys. This is going by the Clearance list, and an auction on ebay.
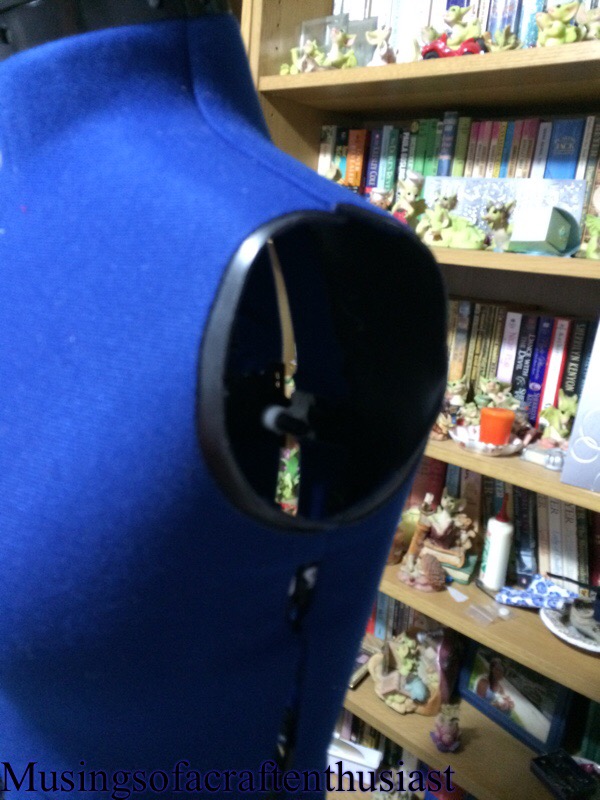
So back to the drawing board, not so much, I got so fed up with the shoulders I sliced them off, not totally obviously, otherwise I’d have nothing to hang my shoulder seams on, I hacked about an inch off of both sides, hacked might even be too kind a word for it, I started off with a pair of scissors and ended up with a craft knife, it wasn’t pretty when I finished, and now there were sharp bits. 😦
 So off to the back room where we had a few bags of clothes waiting to go to the charity shop, Simon had put a couple of t-shirts in there, ideal, they would be nice and long and I’d have some fabric to play with.
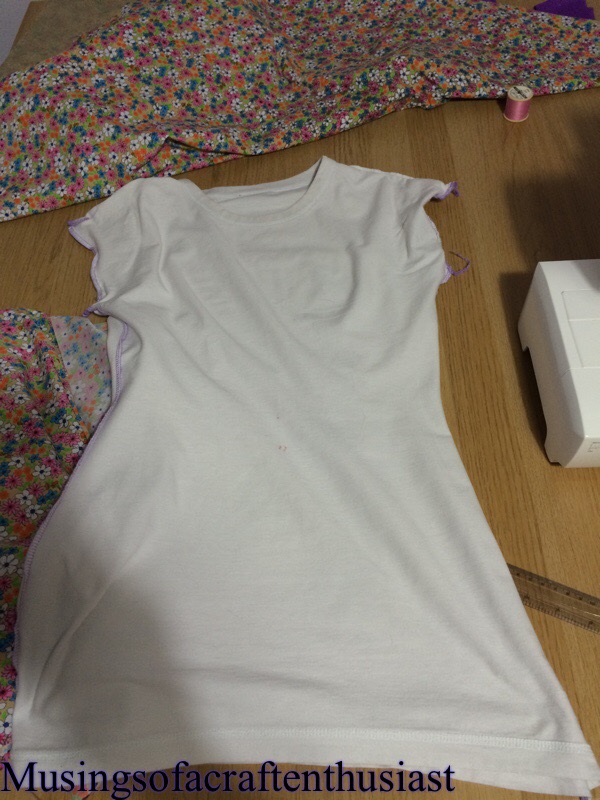
I stitched the sleeves up and took the t-shirt in using my overlocker, why not get a feel for knits at the same time as trying to make my dressmakers Dummy actually usable.

Here is the finished article it still has enough shoulder to hang a dress from, but it is missing just enough that I can get my 1950s dresses on it, still with a struggle but less chance of splitting the under arm seam.

Haslam System of Dresscutting Pt2
Ok, I have made my Blouse, it went together very easily, no funny, I’m not sure what that bit is doing….
There are a couple of problems, one of which is to do with measuring and two, the ladies of the 40s must have been a darned funny shape in the hip/stomach region.
Item one – either I mis-measured my shoulder or I didn’t quite understand what the foundation booklet wanted. I measured my shoulder at 4 1/2 inches it wasn’t wide enough, when I measured it a second time I carefully read the instructions ‘measure from the prominent bone in your neck to the point of your shoulder bone then take 2 1/2 inches away’ after a re-measure it turns out that maybe it should be 5 1/2 inches, this actually corrects half of the problems I had with the blouse.
Item two – The hem of the back of the blouse wasn’t wide enough. I was going on the assumption that the side seams of the blouse should fall level with my under arms. Wrong!!! If I held one side level with where you would expect a side seam the other side was at least an inch out, maybe a bit more. Also I had a lot of fabric in the front, when I say a lot, each front nearly went from one side seam to the other.
 Looking at the instructions you can see why this would happen, you take the hip measurement and quarter it, then you add an inch to the front, the back you deduct an inch.
On the bodice sloper craftsy class I have, you do something similar but only with 1/4 inch. May be I should have done this but I went the other way I measured my hips then I split the measurement up as my body split it up.
There was one other problem but that was connected to my fabric choice, I used a piece of poly cotton which was a bit stiff and I think the fabric should have a lot more drape to it. As it was the blouse looked very boxy and was quite uncomfortable across the back and sleeves, (this should be fixed by the nearly 3 inches added to the back piece across the shoulders).

 I have redrafted the pattern pieces and cut them out in some sort of pink shiny fabric, that I’m not sure why I bought it the colour is totally not what I would wear.


